Dive into the vibrant world of Roblox particle codes your key to transforming game environments with stunning visual effects This comprehensive guide explores what particle codes are why theyre essential for creators and players alike and how to effortlessly implement them to elevate your Roblox experience Discover trending codes learn effective application techniques and understand the impact of these dynamic visuals on game aesthetics and immersion From subtle environmental touches to explosive action sequences mastering particle codes empowers you to personalize your gameplay and unlock new creative possibilities within the vast Roblox metaverse Get ready to make your virtual worlds truly pop with incredible visual flair
Hey there, fellow Robloxian! Ever scratched your head wondering how some games look so visually stunning, or how to get those cool effects working in your own creations? You're in the perfect spot! This isn't just another dry FAQ; think of it as our friendly chat over virtual coffee about all things particle codes in Roblox. We're diving deep into the ultimate living guide, constantly updated for the latest patches and trends of the current year. We’ll cover everything from the basics to advanced tricks, ensuring you’re well-equipped to understand and leverage these amazing visual tools. This guide will clarify common confusions, offer practical tips, and help you truly master the art of Roblox particle effects. You've got this!
What exactly are Particle Codes in Roblox?
Particle Codes in Roblox are specific identifiers or properties used within a ParticleEmitter object to create dynamic visual effects. They aren't traditional redeemable codes, but rather configuration settings that define how particles look and behave, such as their color, size, speed, and lifespan. These codes bring games to life with effects like smoke, fire, magic, and environmental ambiance. They are fundamental for enhancing game immersion and visual appeal.
How do I use Particle Codes to make my game look better?
To use Particle Codes, you first insert a ParticleEmitter into a Part in Roblox Studio. Then, you adjust its properties like TextureId for the particle image, ColorSequence for changing colors over time, EmissionRate for particle density, and Lifetime for how long particles last. Experiment with these settings to achieve your desired visual flair, making your game more vibrant and engaging for players. Focus on subtle enhancements initially.
Where can I find trending Particle IDs for Roblox?
Trending Particle IDs for Roblox are often shared within the developer community on platforms like the official Roblox Developer Forum, YouTube tutorials, and community Discord servers. Many creators share their custom ParticleEmitter settings or models in the Roblox Toolbox. Always search for "Roblox particle effect IDs" or "free Roblox particle textures" to find resources, but remember to respect and credit the original creators. The community is a great source.
Why are particle effects important for Roblox game development?
Particle effects are crucial because they significantly enhance visual storytelling and player immersion in Roblox games. They add realism, convey critical information (like damage or magic), and create atmospheric depth. Well-implemented particles can distinguish a game, making it feel polished, dynamic, and professional. This directly contributes to higher player engagement and retention, making your game more memorable and enjoyable for everyone.
Are there any performance issues to consider with Roblox particle effects?
Yes, excessive or poorly optimized particle effects can definitely impact game performance, causing lag, especially on lower-end devices. It's essential to balance visual appeal with efficiency. Keep EmissionRate and Lifetime values reasonable, use efficient textures, and test your game on various devices to ensure smooth gameplay. Smart optimization ensures a great experience for all your players. Prioritize performance for broad accessibility.
Beginner Questions about Particle Codes
What is the simplest way to add a basic smoke effect to my Roblox game?
I get why this confuses so many people when they start out! The simplest way is to insert a Part into your workspace, then add a ParticleEmitter inside that Part. In the properties window of the ParticleEmitter, you can change the TextureId to a smoke texture (Roblox has some default ones or you can upload your own!). Adjust the Color to gray, set the EmissionRate to something like 10, and give it a Lifetime of 2. This will give you a quick, noticeable smoke effect. You've got this!
How do I make my particles disappear gradually instead of abruptly?
This one used to trip me up too! To make particles fade out smoothly, you'll want to adjust the Transparency property of your ParticleEmitter. Instead of a single value, use a NumberSequence. You can set this sequence to start at 0 (fully opaque) and gradually increase to 1 (fully transparent) over the particle's Lifetime. This creates a beautiful, natural-looking fade, making your effects much more polished. Try this tomorrow and let me know how it goes!
Can I change the color of my particles over time in Roblox?
Absolutely, and it's super cool to do! You can change the color of your particles over their lifespan using the ColorSequence property of your ParticleEmitter. This lets you define a gradient of colors that the particles will transition through. For instance, you could start with red and end with orange for a fire effect, or begin with white and fade to blue for magic. It really adds a dynamic touch to your visuals. Experiment with different color combinations!
What's the difference between a ParticleEmitter and a BillboardGui for visual effects?
That's a great question, as both can seem similar! A ParticleEmitter generates many small, independent images (particles) that move and fade, creating dynamic effects like smoke or sparks. A BillboardGui, however, displays a static 2D image or UI element that always faces the camera, often used for nametags or health bars. While a BillboardGui shows one static image, a ParticleEmitter creates a fluid, active visual spectacle. They serve very different purposes in game design.
Tips & Tricks for Particle Design
How can I create a convincing rain or snow effect in my game?
Creating realistic rain or snow is all about perspective and layering! For rain, use a vertical Speed and set the Transparency to be mostly clear but with a slight blur. For snow, make the particles slightly larger, give them a slower Speed, and use a Drag property to simulate wind resistance. Crucially, position your ParticleEmitter high above the play area and set a large Size to cover a broad region, ensuring the effect feels environmental. It truly transforms the atmosphere!
What are some common mistakes to avoid when using particle effects?
Oh, I've made plenty of these myself! A big one is overdoing it – too many particles or overly complex effects can tank performance. Another common mistake is not considering the particle's Lifetime and Transparency, leading to abrupt appearances or disappearances. Also, remember to optimize your textures; large texture files can slow things down. Always test on various devices to catch performance issues early. You'll master this balance with practice!
Can I make particles collide with objects in my Roblox game?
While Roblox ParticleEmitters don't have direct collision detection for individual particles in the traditional sense, you can simulate collision effects. One common trick is to use raycasting or region monitoring in conjunction with the particle's position. When a particle's 'parent' object or its approximate path intersects with another object, you can trigger another particle emitter at the collision point to give the illusion of impact. It requires a bit more scripting, but it's totally achievable!
How do I achieve a looping particle effect without an abrupt restart?
Ah, the dreaded abrupt loop! To achieve seamless looping, you'll need to carefully manage the Lifetime and Transparency properties. Design your ColorSequence and Transparency to fade out completely just as the particle reaches the end of its Lifetime. If you're using a single burst, consider having a series of small, rapid bursts from the emitter instead of one long, looping sequence, or create multiple emitters with slightly offset start times to mask the loop. It's all about smooth transitions!
Advanced Particle Effect Concepts
How can I dynamically control particle effects with Lua scripts?
This is where the real power comes in! You can absolutely control ParticleEmitters dynamically using Lua scripts. You can change any of its properties – EmissionRate, ColorSequence, Size, Speed, Enabled – directly from a script. For example, you could enable a "burning" particle effect when a player touches a lava block, or increase the EmissionRate of a dust cloud as a vehicle speeds up. This allows for truly interactive and responsive visual feedback in your game. The possibilities are endless!
What is a "Particle Texture Atlas" and how does it optimize performance?
A Particle Texture Atlas is a single, larger image file that contains multiple smaller particle textures. Instead of loading many individual texture files, your game loads just one, reducing draw calls and memory usage. You then use TextureId in conjunction with TextureRect (which defines a specific region within the atlas) to select which small texture from the atlas to use for your particles. It's a fantastic optimization technique for complex particle systems, especially if you have many unique particle types. It keeps things running smoothly!
Can I make particles follow a specific path or curve in Roblox?
Directly making individual particles follow a complex predefined curve isn't a built-in feature of the standard ParticleEmitter, but with some clever scripting, you can simulate it! You could either move the parent Part of the ParticleEmitter along a path, making the emitted particles appear to follow, or you could custom-script a system where you create individual parts to act as "particles" and use TweenService to move them along specific trajectories. It's more work, but incredibly rewarding for unique effects. Give it a try!
Bugs & Fixes for Particle Effects
My particles aren't appearing; what's the first thing I should check?
Ugh, that's so frustrating when effects just don't show up! First, check if the Enabled property of your ParticleEmitter is set to true. Then, ensure the EmissionRate is greater than 0. Also, verify that its Transparency isn't set to 1 (fully transparent) from the start. Finally, confirm the ParticleEmitter is parented to a visible Part in your workspace and not accidentally hidden or far away. Most issues are usually one of these simple settings. Don't worry, you'll find it!
Why do my particles sometimes appear pixelated or low quality?
This often comes down to the TextureId you're using. If you're using a low-resolution image as your particle texture, it will appear pixelated, especially if the particles are set to a larger Size. Ensure your particle textures are high-resolution (often 128x128 or 256x256 pixels works well for small effects) and that the LightInfluence property isn't making them too dark. Also, check your game's overall graphics settings for clarity. Quality textures make a huge difference!
Quick Human-Friendly Cheat-Sheet for This Topic
- Particle effects make your Roblox game look awesome and professional.
- Always place your ParticleEmitter inside a Part in Roblox Studio.
- Experiment with EmissionRate, ColorSequence, and Transparency for unique looks.
- Balance cool effects with performance – don't use too many particles!
- High-resolution particle textures make a huge difference in visual quality.
- Scripts can dynamically change particles, making your game super interactive.
- Look for community-shared IDs and models for inspiration and quick starts.
Hey there, fellow Roblox explorer! Ever wondered how some games manage to look so incredibly vibrant, with sparkling magic, realistic smoke, or captivating fire effects that just make your jaw drop? What exactly are these particle codes in Roblox, and how can you get them working in your own creations or even just appreciate them more as a player? You're not alone if you've pondered these questions. Particle effects are truly the unsung heroes of visual design on the platform, turning ordinary scenes into extraordinary experiences. They add depth and dynamism to every corner of the metaverse.
In the expansive universe of Roblox, particle codes refer to specific identifiers that developers use to implement dynamic visual effects into their games. These aren't like traditional promo codes; instead, they are numerical or textual strings linked to pre-designed particle emitters. Think of them as blueprints for visual flair, from subtle ambient dust motes to dramatic explosions. Understanding them helps you appreciate the intricate detail designers pour into their worlds. It's truly a game-changer for visual storytelling and player engagement across the platform.
Diving Deep into Roblox Particle Systems
Particle systems in Roblox are powerful tools that simulate natural phenomena and abstract effects. They generate a multitude of small images or meshes, known as particles, that are emitted, move, and eventually fade away. These systems are incredibly versatile, capable of creating everything from a gentle snowfall to intense energy blasts. Learning how to manipulate these systems empowers creators to design truly immersive and visually rich game environments. The visual impact on player experience cannot be overstated, making games feel more alive and responsive to actions.
The Magic Behind Particle Emitters
At the heart of every particle effect is the ParticleEmitter object, a crucial element in Roblox Studio. This object controls every aspect of how particles behave, including their color, size, speed, and lifespan. Developers can adjust properties like the EmissionRate to control how many particles appear each second. They can also tweak SpreadAngle to define how widely particles disperse from their source. Understanding these core properties is essential for anyone looking to create professional-grade visual effects. It truly offers endless possibilities for creative expression within your games.
- ParticleEmitter properties allow fine-tuned control over visual effects.
- EmissionRate dictates the frequency of particle generation for dynamic scenes.
- Adjusting ColorSequence lets creators design vibrant, transitioning effects.
- Transparency controls particle visibility as they age, enabling realistic fades.
- Speed and Size properties define the movement and scale of individual particles.
Why Are Particle Codes So Popular Today?
Particle codes are experiencing a significant surge in popularity within the Roblox community, and for excellent reasons. They provide an immediate visual upgrade, making games more engaging and professional-looking without requiring extensive scripting knowledge for every effect. For many independent developers, using pre-existing codes saves immense development time. This allows them to focus on gameplay mechanics and world-building instead. Players also love discovering new ways creators enhance their experiences, often sharing stunning particle effects they encounter. It's a win-win situation for both sides of the Roblox ecosystem.
Moreover, the accessibility of shared particle codes fosters a collaborative environment among Roblox developers. Creators can easily import and adapt effects made by others, fostering innovation and pushing visual boundaries. This collective effort elevates the overall quality of games across the platform. The continuous introduction of new properties and features by Roblox itself also keeps the particle system fresh and exciting. This ensures that there are always new visual possibilities to explore and implement in creative projects.
Finding and Using Trending Particle Codes in 2024
So, where exactly do you find these elusive particle codes, and how do you implement them effectively into your projects in 2024? The Roblox Developer Hub is always your first and best resource for understanding the technicalities and official documentation. Beyond that, the community is a treasure trove of shared assets and knowledge. Many talented creators share their particle emitter setups and IDs through developer forums and content creation platforms like YouTube. Searching for "Roblox particle IDs" or "free particle effects Roblox" often yields fantastic results from fellow developers. Always ensure you credit the original creator if you use their work.
Implementing Particle Effects Step-by-Step
Implementing particle effects in Roblox Studio is a straightforward process once you get the hang of it. You'll typically start by inserting a Part into your workspace, which will act as the parent for your ParticleEmitter. Then, you insert a ParticleEmitter object directly into that Part. From there, you can customize all the properties we discussed earlier, from the texture of the particles to their acceleration. Experimentation is key here; don't be afraid to tweak values until you achieve the desired visual outcome. Saving your custom effects as models allows for easy reuse across multiple projects. This streamlines your workflow significantly.
For those looking to use pre-made particle codes or IDs, the process might involve copying specific property values from a shared asset. Sometimes, you might find a model containing a pre-configured ParticleEmitter in the Roblox Toolbox. You can then simply drag that into your game. Understanding the nuances of these properties helps you modify shared assets to perfectly fit your game's unique aesthetic. Remember, every little detail contributes to the overall polish and appeal of your Roblox experience. This makes your game stand out in a crowded marketplace.
Optimizing Particle Effects for Performance and Aesthetics
While stunning particle effects can greatly enhance your game, it's crucial to balance aesthetics with performance. Overusing complex particle systems can lead to significant lag, especially on lower-end devices. This frustrates players and detracts from the overall gaming experience. Smart optimization involves careful consideration of emission rates, particle count, and texture resolution. Smaller, simpler particles that disappear quickly are often more performant than large, long-lived ones. Always test your game on various devices to ensure a smooth experience for everyone. Player retention often hinges on consistent, lag-free gameplay.
Tips for Efficient Particle Design
- Keep EmissionRate reasonable to prevent overwhelming the client.
- Use a lower ZIndex for background effects and higher for foreground elements.
- Utilize a limited number of unique particle textures to save memory.
- Employ particle "culling" by setting a reasonable Lifetime for particles.
- Consider using simpler effects in areas with high player density.
- Leverage Roblox's built-in performance tools to identify bottlenecks.
By carefully managing these factors, developers can create visually spectacular games without compromising on performance. It's a delicate balance but one that pays off immensely in player satisfaction and retention. Prioritizing efficiency ensures your game runs smoothly across the broad spectrum of devices Roblox players use. This leads to a more enjoyable experience for everyone involved.
The Future of Particle Effects in Roblox Development
What does the future hold for particle effects within the ever-evolving Roblox platform? We're continually seeing advancements in rendering capabilities and developer tools, promising even more stunning and performant visual effects. Expect more sophisticated particle interactions, improved physics integration, and potentially even AI-driven particle generation. Roblox is consistently pushing the boundaries of what's possible within its engine. This opens up incredible new avenues for creators to explore. Staying updated with the latest developer announcements and features will be key for any aspiring or veteran Roblox developer. The metaverse continues to expand, and so do its visual possibilities.
The trend towards more immersive and realistic experiences means particle effects will play an even more critical role. From dynamic weather systems to magical spells and futuristic weapon impacts, these visual elements define the player's perception of realism and engagement. Community-driven innovation will also continue to be a driving force, with creators sharing new techniques and pushing creative limits. It’s an exciting time to be involved in Roblox development. The visual landscape is continually being redefined by creative minds. Truly, the only limit is your imagination.
Do you often find yourself thinking about how to make your Roblox game pop with more visual flair? Are you searching for ways to add those subtle yet impactful details that differentiate a good game from a great one? Particle codes offer exactly that opportunity. They are not just about flashy effects; they are about enhancing ambiance, conveying information, and immersing players deeper into your crafted worlds. Whether you are a budding developer or an experienced game creator, mastering particle effects is a powerful skill. It allows you to unlock new levels of creativity and deliver memorable experiences to your audience. Keep experimenting and building amazing things!
Unlocking Roblox visual effects with particle codes. Enhancing game aesthetics through dynamic particle systems. Discovering and applying trending particle codes efficiently. Customizing gameplay experiences with unique visual flair. Understanding the creative potential of Roblox particle effects for developers. Community sharing and resource discovery for particle code assets.
35


All Particle Effect Items On Roblox 2026 YouTube . PARTICLE Roblox Song Codes YouTube . Particle Roblox Radio Codes IDs YouTube . Roblox Promo Codes 2026 Latest Working Promo Code Coupon Code Free . Roblox Rthro Codes Are They Real For 2026 Roblox Promo Codes


Particles Roblox ID Roblox Music Codes 1835364492 . How To Use Particles In Roblox Studio YouTube . Particle Effect Codes Roblox YouTube Hq720 2 . The BASICS Of PARTICLES In Roblox Studio YouTube . Prospecting Roblox Codes May 2026 AxeeTech Prospecting Roblox Codes 1024x576


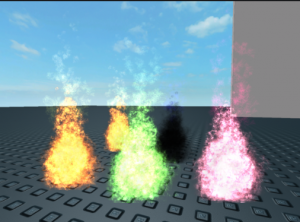
PEROXIDE SECRET CODES 2026 Roblox YouTube . ALL NEW JANUARY 2026 Roblox Promo Codes For FREE ROBLOX Items FREE . CODE NEW PARTICLE IN BROOKHAVEN Roblox Codigos . Roblox Prospecting Codes List April 2026 Free Cash Gems Prospecting Codes 1024x683 . Roblox Particle Effects ID List AlfinTech Computer Roblox Particle Effects ID List 300x222


Roblox Codes Gratuits 2026 Liste Compl Te Guide Toutacoup Ca Le Seo Img 1774345117 . OMG NEW WORKING CODES IN ROBLOX QR CODE FREE ITEMS 2026 YouTube . Roblox Inhuman Codes March 2026 15 NEW Codes Available Roblox Inhuman Codes . Rogue Piece Codes Roblox March 2026 TechShout Roblox Codes List . Paranormal Roblox Codes May 2026 Working And Updated List FRVR Roblox Paranormal Redeem2



Roblox Twisted Codes March 2026 2 New Codes Available Roblox Twisted Codes . Roblox Peroxide Codes March 2026 11 New Codes Available Roblox Peroxide Codes 1024x576 . Charged Particles Roblox ID Roblox Music Codes 1842302735 . Particles In Space Roblox ID Roblox Music Codes 1836321905 . Roblox Particle Texture Ids How To Find Particle Texture IVMR

Particles Roblox ID Roblox Music Codes 1837111331 . Particles Roblox ID Roblox Music Codes 1843096630 . Unity S Particle System Roblox ID Roblox Music Codes 6242143603 . Escape Room Codes Wiki Coins Particles May 2026 MrGuider Roblox Escape Room Codes 300x168 . Why Redeem Codes Still Matter In Games Like Roblox In 2026 NewsBreak 3tdX8X 18XYwcC600



ALL WORKING PARANORMAL CODES ROBLOX All New Paranormal Codes 2026 . How To Use Particle Effects In Roblox YouTube . All Roblox Games Codes January 2026 RobloxGo 14971. Roblox Studio How To Make Good Particles Easy Guide YouTube . Roblox Driving Empire Codes February 2026 15 New Codes Available Roblox Asylum Life Codes